


Introduction
Running into a BitLocker Recovery Key message on your Windows system can be confusing and a bit scary. This often happens alongside a Blue Screen, a common problem that can make it hard to use your device and keep your data safe. Understanding BitLocker's role and recovering the key are essential to resolving this situation.
In this article, you will learn:
- The fundamental concepts of BitLocker in Windows systems.
- Step-by-step methods to locate your Recovery Key.
- Insights into why your device may require a Recovery Key.
With this knowledge, you'll be better equipped to handle BitLocker prompts confidently and regain access to your locked device by using the recovery key.
BitLocker Explained: Securing Your Windows Device
BitLocker, an integral feature of Windows security, stands at the forefront of data protection, offering robust encryption for your device’s hard drive. This encryption is not just about scrambling data; it's about ensuring that your personal and sensitive information remains inaccessible to unauthorized users, especially in situations where your device might be lost or stolen. But how does BitLocker achieve this level of security, and what are its core functionalities?
Detailed Explanation of BitLocker and Its Function in Windows
BitLocker employs sophisticated encryption algorithms to secure the entire hard drive of your Windows device. When activated, it encrypts every bit of data on the drive, making it unreadable to anyone without the correct authentication methods. This encryption process is seamless, working in the background without disrupting your daily tasks. The beauty of BitLocker lies in its integration with the operating system, providing a seamless experience without sacrificing security.
Exploring the Various Layers of BitLocker Protection
BitLocker offers several protection methods, catering to different security needs and hardware configurations:
- TPM (Trusted Platform Module): Most modern Windows devices come with a TPM chip. This chip securely stores the encryption keys, releasing them only upon successful verification of the boot process. This method is highly secure, as the keys are never exposed to the external environment.
- PIN Protection: In addition to TPM, you can set a PIN at startup. This method requires you to enter a PIN every time you boot the device, adding an extra layer of security.
- USB Key Mode: For devices without TPM, or for added security, you can use a USB drive as a key. The device will only boot when this USB drive is inserted, ensuring that even if your device is stolen, the data remains secure.
- Recovery Key: In cases where TPM or PIN verification fails, or the USB key is lost, BitLocker provides a recovery key – a unique code to regain access to your encrypted drive.
Situations Triggering BitLocker Recovery Mode
BitLocker, Microsoft's encryption tool, is designed to safeguard data by detecting unauthorized attempts to access the system. Understanding the various situations that can trigger BitLocker to enter recovery mode is crucial for efficiently managing and maintaining the security of your Windows device. Here are some common scenarios that require the use of the recovery key:
1. Hardware Changes
- Scenario: Significant changes to your device's hardware, such as replacing the motherboard or hard drive.
- BitLocker's Response: Views these changes as potential security breaches and asks for the recovery key as a preventive measure.
2. Firmware Updates
- Trigger: Updating the BIOS or firmware of your device.
- BitLocker's Perception: May interpret these updates as changes in the system’s boot environment, leading it to request the recovery key.
3. Failed TPM Validation
- Issue: BitLocker relies on the Trusted Platform Module (TPM) to ensure the integrity of the boot process.
- Recovery Mode Activation: If BitLocker cannot validate the TPM's security, it will switch to recovery mode to protect the system.
4. Manual Triggering
- Scenarios: Users or administrators might intentionally trigger recovery mode.
- Reasons: This can be for security audits, system testing, or other administrative purposes.
To gain a deeper understanding of BitLocker encryption and its foundational principles, we recommend reading our comprehensive guide 'BitLocker Essentials: In-Depth Guide to Windows Encryption.' This resource offers detailed insights into BitLocker's capabilities and how it helps protect your data.
Having explored the fundamentals of BitLocker encryption, we'll now focus on a key aspect of data security: locating your BitLocker Recovery Key. In the upcoming section 'Finding Your BitLocker Recovery Key,' we'll dive into practical steps to retrieve this crucial piece of information, ensuring you're well-prepared for any recovery scenarios.
Finding Your BitLocker Recovery Key
When faced with a BitLocker recovery prompt, the key to unlocking your Windows device lies in accessing the Recovery Key. This section provides a detailed, step-by-step guide to locating your Recovery Key in various scenarios, ensuring that you can regain access to your device and data efficiently.
Step-by-Step Guide to Locate the BitLocker Recovery Key
Retrieving your BitLocker Recovery Key can be done through several methods, depending on how you initially backed it up. Below are detailed instructions for each method, along with troubleshooting tips for common issues you might encounter
1- Check the Printed Document or External Storage:
When you first activate BitLocker on your device, you are prompted to save the recovery key. This key might be printed out or saved on an external storage device. Check any secure locations where you keep important documents or digital backups.
2- Retrieving the key from a Microsoft Account:
If you've backed up your recovery key to your Microsoft account, retrieving it is straightforward.
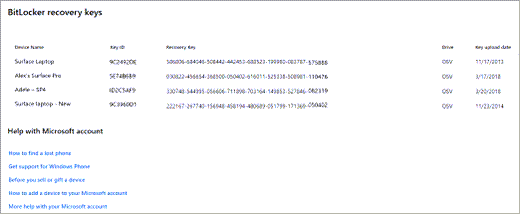
- Step 1: Open your web browser and navigate to the Microsoft account recovery key page: https://account.microsoft.com/devices/recoverykey.
- Step 2: Sign in using your Microsoft account credentials.
- Step 3: Once signed in, locate the device for which you need the recovery key.
- Step 4: Click on the device to reveal the associated BitLocker Recovery Key.
Troubleshooting Tips:
- If you can't find your device listed, ensure you're logged into the Microsoft account used during the initial BitLocker setup.
- In case you're unable to access your Microsoft account, consider using account recovery options or contact Microsoft support for assistance.
3- Retrieving from Active Directory (For Enterprise Users)
In an enterprise environment, the recovery key might be stored in the Active Directory.
- Step 1: Contact your system administrator or IT department.
- Step 2: The administrator will access the Active Directory Users and Computers console.
- Step 3: They will locate your computer account and retrieve the BitLocker Recovery Key from the 'BitLocker Recovery' tab under the computer properties.
Troubleshooting Tips:
- Ensure that the BitLocker Recovery Key was initially backed up to Active Directory by your IT department.
- If the key is not found, the IT department might need to check Group Policy settings or consult their BitLocker administration protocols.
4. Retrieving from Azure Active Directory (Azure AD)
For devices joined to Azure AD, the recovery key can be retrieved through the Azure portal.
- Step 1: Log in to the Azure portal at https://portal.azure.com.
- Step 2: Navigate to Azure Active Directory and then select 'Devices'.
- Step 3: Choose the device in question.
- Step 4: Under the 'Devices' section, find and click on the option to view the BitLocker keys.
Troubleshooting Tips:
- Make sure you have the necessary permissions in Azure AD to view the recovery key. If not, contact your Azure AD administrator.
- If you cannot locate your device, verify that it's properly registered in Azure AD and that BitLocker key storage is enabled for your device.
Steps to Take if the Recovery Key is Not Found or Inaccessible
Losing access to the BitLocker recovery key can be stressful, especially if you're locked out of an encrypted drive. Here are some steps you can take if you find yourself in this situation:
1. Check with Other Users
- Shared Device: If the device is shared with others, such as in a family setup, ask if someone else might have the key or access to the Microsoft account where it could be saved.
2. Look into Backup Email Accounts
- Email Backup: When setting up BitLocker, you might have chosen to email the recovery key to yourself. Check any backup or secondary email accounts you might have used.
- Search Tips: Look for terms like "BitLocker recovery key" in your email search bar.
3. Use Command Prompt (For Advanced Users)
- Access to Windows System: If you can still log into your Windows system, use the Command Prompt to try retrieving the key.
- Open Command Prompt as an administrator.
- Type
manage-bde -protectors C: -getand press Enter. Replace 'C' with the letter of your encrypted drive if it's different. - If the recovery key is stored locally on the device, it will be displayed here.
4. Consulting IT Support in a Corporate Environment
- Corporate Settings: If you're in a corporate environment and the key is not found in Active Directory or Azure AD, contact your IT support team.
- Additional Methods: IT departments may have alternative methods or specific policies for recovery key retrieval.
Additional Considerations
- Preventive Measures: In the future, consider multiple backup methods for your recovery key. This might include printing it out, saving it on a USB drive, or storing it in a secure digital vault.
- Data Loss Risks: Be aware that if you cannot find the recovery key and you're locked out of the drive, there's a risk of permanent data loss.
- Last Resort: As a last resort, and if you have access to the system but not the recovery key, you might consider resetting BitLocker. This will involve decrypting and re-encrypting the drive, but be aware that this is only possible if you have access to the Windows account that controls BitLocker.
The BitLocker recovery key is a critical component of your data security setup, and taking the right steps when it's lost or inaccessible is essential to protect your data.
Troubleshooting BitLocker Recovery Issues
If you encounter challenges or complexities in retrieving your Recovery Key, or if it remains inaccessible, further assistance is available. Explore our in-depth Troubleshooting Guide for BitLocker Issues to navigate through more complex recovery scenarios and solutions.
What to Do If All Else Fails
In the unfortunate event that the recovery key cannot be located by any means, the options become limited. It's crucial to understand that without the recovery key, the encrypted data on the BitLocker-protected drive remains inaccessible. This underscores the importance of keeping multiple backups of the recovery key in secure but accessible locations.
Having delved into the detailed steps for 'Finding Your BitLocker Recovery Key,' you're now equipped with the knowledge to locate your key in various scenarios. This understanding is crucial for prompt action during a BitLocker prompt. Next, we shift our focus to 'User Experience During BitLocker Recovery.' This section will provide a closer look at what users can expect during the recovery process, offering insights into the practical aspects and potential challenges encountered. Understanding the user experience will further prepare you to handle the BitLocker recovery process smoothly and efficiently, ensuring your experience is as stress-free as possible.
User Experience During BitLocker Recovery
Navigating through a BitLocker Recovery process can be daunting for many users. Understanding what to expect during this process can alleviate stress and provide clarity. This section outlines the user experience during the BitLocker recovery process, including time expectations, potential challenges, and reassurances about data safety.
What to Expect During the Recovery Process
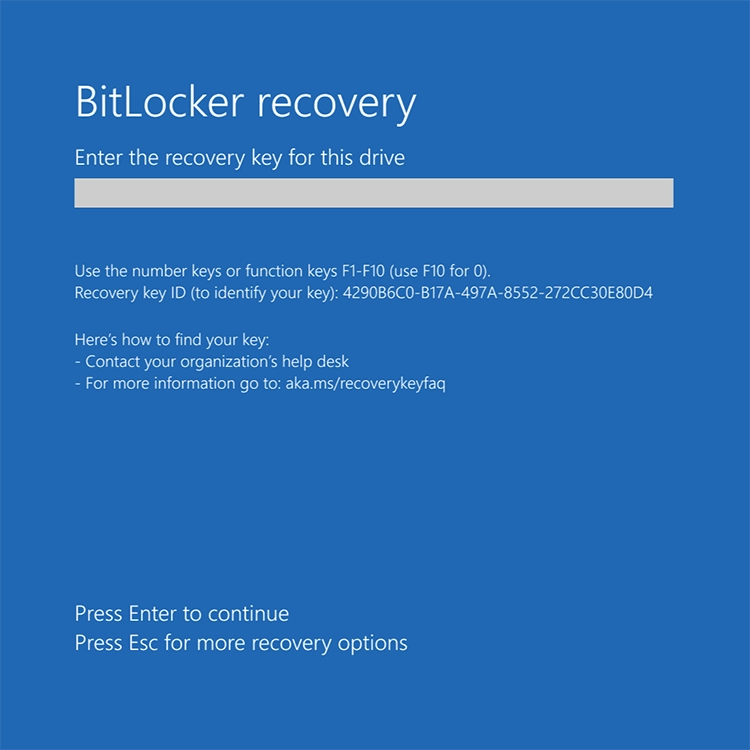
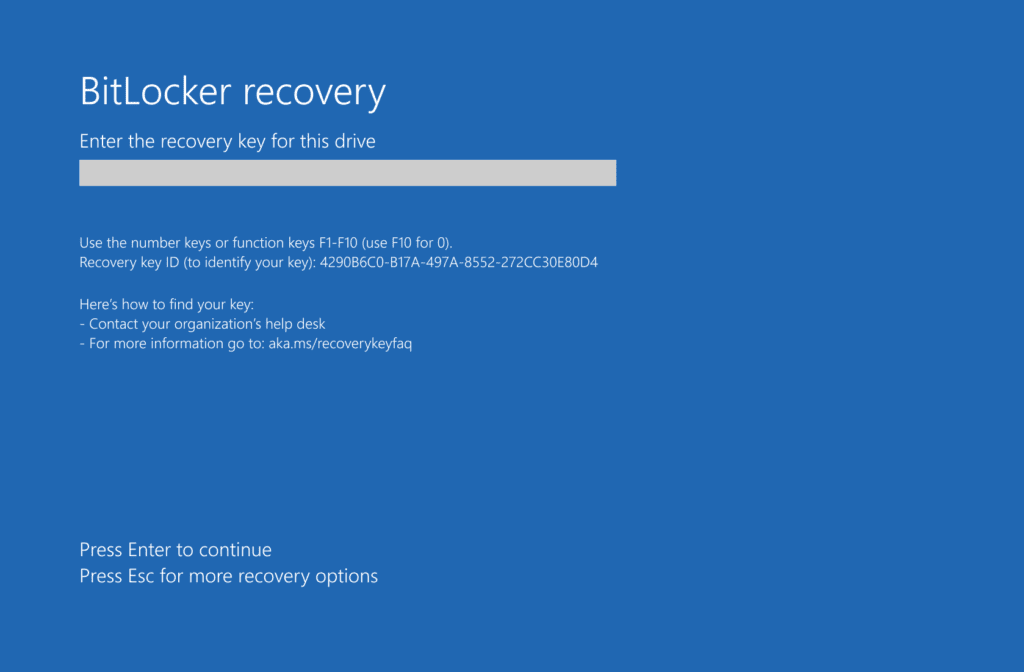
- Prompt Appearance: Initially, you'll be confronted with a BitLocker Recovery screen asking for the recovery key. This usually happens after a system change, such as a hardware modification or a significant software update.
- Retrieving the Recovery Key: Depending on where your key is stored (Microsoft account, USB drive, printed copy, etc.), this step might take a few minutes to over an hour. Accessing online accounts for key retrieval is generally quicker, provided you have immediate access to the internet and your account credentials.
- Key Entry: Once you have the key, entering it should take just a few minutes. The key is a long string of characters, so careful entry is essential to avoid errors.
- System Boot: After the correct key entry, your system will continue to boot. This should take the same amount of time as a normal system start-up.
Potential Hurdles During Recovery
- Incorrect Key Entry: One common issue is entering the key incorrectly. Double-check the key as you enter it to avoid this error.
- Key Not Found: If you cannot locate your key, this can significantly prolong the process. Check all possible storage locations, including digital backups and physical copies.
- Internet Connectivity Issues: For keys stored in online accounts, internet connectivity issues can delay the process.
- System Issues: In rare cases, other system issues might complicate the recovery process, such as hardware failures or software glitches.
Reassurances on Data Safety
- Data Integrity: BitLocker encryption maintains the integrity of your data. As long as you enter the correct recovery key, your data remains safe and unaltered.
- No Data Leakage: During the recovery process, there is no risk of data leakage. BitLocker’s design ensures that data remains encrypted and secure until the correct key is entered.
- Limited Attempts: BitLocker does not lock you out permanently after several incorrect attempts. However, you may experience a temporary delay after multiple wrong entries.
Tips for a Smoother Recovery Experience
- Stay Calm: Approach the process calmly. Stress can lead to mistakes, especially when entering the long recovery key.
- Organize Key Storage: Keep your recovery key in an easily accessible but secure location. Knowing exactly where your key is can significantly reduce recovery time.
- Plan for Internet Access: If your key is stored online, ensure you have a way to access the internet before starting the recovery process.
- Seek Help if Needed: Don’t hesitate to seek assistance, whether from IT professionals, support forums, or Microsoft support channels, especially if you encounter unexpected issues.
Having outlined the BitLocker recovery process, we now understand that while it may seem daunting, it is actually quite manageable with the right knowledge and preparation. The real test of this process comes to life in practical situations. Next, in our 'Case Studies: Navigating BitLocker Recovery Key Scenarios,' we'll explore real-world examples. These case studies will illustrate how the concepts and strategies we've discussed are applied in various BitLocker recovery situations, providing you with a clearer understanding and practical insights into managing these scenarios effectively.
Case Studies: Navigating BitLocker Recovery Key Scenarios
To better understand the practical application of the recovery key retrieval process, let’s explore some hypothetical yet realistic scenarios. These case studies will illustrate common situations where users may encounter the BitLocker Recovery Key prompt and demonstrate how they can effectively resolve these issues using the guidance provided in this article.
Scenario 1: Hardware Upgrade
Background: Alex, an avid gamer, decides to upgrade his PC's motherboard and graphics card. After the hardware changes, he's greeted with a BitLocker Recovery Key prompt upon booting up his system.
Resolution Steps:
- Alex remembers saving his BitLocker Recovery Key in his Microsoft account.
- He uses his smartphone to navigate to the Microsoft account recovery key page and logs in.
- Locating his PC in the list of devices, he retrieves the BitLocker Recovery Key.
- Alex enters this key at the prompt on his PC, successfully bypassing the BitLocker screen and regaining access to his system.
Key Learning: Significant hardware changes can trigger BitLocker’s protection mechanism. Keeping the recovery key accessible, like in a Microsoft account, can quickly resolve this issue.
Scenario 2: Firmware Update in a Corporate Environment
Background: Maria, working in a large corporation, receives an automated firmware update on her company laptop. Post-update, she encounters the BitLocker Recovery Key prompt.
Resolution Steps:
- Since the laptop is managed by her company, the BitLocker Recovery Key is stored in the Active Directory.
- Maria contacts her IT department, explaining the situation.
- The IT team retrieves the key from the Active Directory and provides it to her.
- Maria enters this key at the prompt, regaining access to her laptop.
Key Learning: In corporate environments, the IT department often manages BitLocker keys, and contacting them is a reliable way to resolve recovery prompts following system updates.
Scenario 3: Failed TPM Validation
Background: John’s laptop, which has been functioning normally, suddenly asks for the BitLocker Recovery Key on startup. He realizes this might be due to a TPM malfunction.
Resolution Steps:
- John recalls backing up his recovery key on a USB drive.
- He inserts the USB drive into his laptop and accesses the recovery key file.
- John then inputs the recovery key at the prompt, allowing him to access his system.
- Concerned about the TPM issue, John decides to schedule a check-up for his laptop.
Key Learning: Hardware issues like TPM failure can trigger a recovery prompt. Having a physical backup of the recovery key, such as on a USB drive, is a practical solution.
Scenario 4: Azure AD-Managed Device Lost Connection
Background: Sara uses a laptop for her remote work, which is managed through Azure AD. After a long period offline while on vacation, she faces a BitLocker prompt when trying to log in.
Resolution Steps:
- Sara logs into the Azure portal using her credentials on her mobile device.
- She navigates to Azure Active Directory and selects her laptop under 'Devices'.
- Sara locates the BitLocker recovery key associated with her laptop.
- She
enters the recovery key at the prompt on her laptop, which then allows her access to her system.
Key Learning: For devices managed through Azure AD, especially in remote work scenarios, the Azure portal is a reliable resource for retrieving BitLocker keys after extended offline periods or connectivity issues.
Scenario 5: Lost USB Key
Background: Emily uses a USB key as a part of her BitLocker authentication method for added security. Unfortunately, she misplaces the USB drive and is locked out of her system.
Resolution Steps:
- Emily remembers that she had also saved a copy of the BitLocker Recovery Key in her Microsoft account.
- Using her phone, she accesses the Microsoft account recovery key page and finds her device listed.
- Emily retrieves the recovery key and inputs it at the BitLocker prompt on her computer.
- Once she regains access, she decides to create a new USB key for BitLocker and safely stores the new recovery information.
Key Learning: Having a secondary backup of the BitLocker Recovery Key, like in a Microsoft account, can be a lifesaver if the primary authentication method (such as a USB key) is lost or unavailable.
Scenario 6: System Test in a Corporate Setting
Background: Kevin, an IT administrator, needs to perform a security audit and decides to manually trigger BitLocker recovery mode on several systems to test the response protocols.
Resolution Steps:
- Kevin informs the staff about the planned test and assures them that the recovery keys are securely stored in the company’s Active Directory.
- During the test, each staff member receives a BitLocker prompt.
- Kevin retrieves the respective recovery keys from the Active Directory and provides them to the staff.
- After the successful completion of the test, Kevin reviews the process and makes necessary updates to the company’s BitLocker recovery protocols.
Key Learning: Manually triggering the recovery mode is a useful exercise in corporate environments to test and refine BitLocker recovery procedures and ensure that keys are correctly stored and accessible.
The case studies we've just explored highlight the diverse situations where you might encounter a BitLocker Recovery Key prompt, emphasizing the crucial role of having your recovery key backed up securely and understanding how to retrieve it. As we move forward, our next focus will be 'Best Practices for Recovery Key Storage.' This section is designed to provide you with effective strategies for storing your BitLocker Recovery Key. Whether you're an individual user or managing keys within a larger organization, these best practices will be instrumental in ensuring that you always have uninterrupted access to your system and that your data remains protected under all circumstances.
Best Practices for Recovery Key Storage
Storing and managing BitLocker Recovery Keys is a crucial aspect of data security. Here are best practices to ensure your keys are secure yet accessible when needed:
1. Multiple Backup Methods
- Print and Store: Print the recovery key and store it in a secure location, such as a safe or a locked drawer. Physical copies can be invaluable if digital backups fail.
- External Storage Devices: Save the key on an external storage device like a USB drive, and keep it in a secure, but different location from the printed copy.
- Digital Backups: In addition to cloud storage, consider saving the key in a secure digital vault or encrypted file on a different device.
2. Utilizing Cloud Services
- Microsoft Account: For personal devices, backing up your recovery key to your Microsoft account is a convenient option. It provides easy online access and is linked directly to your Windows device.
- Cloud Storage: Use trusted cloud storage services for backing up your recovery key. Ensure that your cloud account has strong passwords and, if available, enable two-factor authentication for added security.
3. Secure Physical Storage
- Safekeeping: Store any physical copies of your recovery key (like printouts or USB drives) in a secure location. A lockable drawer, a safe, or a deposit box can be good options.
- Separation: Keep the recovery key physically separate from the device it unlocks. If the device is lost or stolen, the key should not be with it.
4. Access Control
- Limited Access: Limit access to your recovery key to only those who absolutely need it. In a family or shared device scenario, ensure all users know where the key is and understand its importance.
- Enterprise Control: In a corporate setting, control access to recovery keys through policies and permissions. Regularly audit who has access and why.
5. Regular Updates and Audits
- Update Keys: If you reset BitLocker or make significant changes to your security setup, update your recovery key and its backups accordingly.
- Audit Storage: Regularly check the storage locations and status of your recovery key backups. This ensures they are still secure and accessible.
6. Documentation and Records
- Record Keeping: Maintain a record of where your recovery keys are stored. In a corporate environment, this should be part of your IT security documentation.
- Labeling: If you have multiple devices with BitLocker, label each recovery key clearly to avoid confusion.
The insights provided in the 'Best Practices for Recovery Key Storage' section are essential for the effective management of your BitLocker Recovery Keys, a crucial step in safeguarding your data. As you implement these strategies, you'll find a balance between security and accessibility, essential for peace of mind in data protection. To further enhance your understanding and address any lingering questions, our next section, 'FAQs: BitLocker Recovery Key Issues in Windows,' delves into frequently asked questions. This segment aims to clarify common doubts and provide additional insights, ensuring you're fully equipped to handle BitLocker recovery key issues with confidence.
FAQs: BitLocker Recovery Key Issues in Windows
A BitLocker Recovery Key is a unique 48-digit code used to unlock your encrypted drive. It's crucial for Surface users to access their data if the usual login methods fail.
You'll need it if the trusted boot information changes, like after a BIOS update, or if you forget your password.
It's usually stored in your Microsoft account, on a USB drive, or printed as a hard copy.
Yes, the method varies - it could be through your Microsoft account, Active Directory, or Azure AD for enterprise devices.
Check all potential storage locations thoroughly, and contact your system administrator if it's a work device.
Yes, storing it in the cloud, like in a Microsoft account, is secure and recommended for easy access.
Verify you're using the correct key for the specific device. If it still doesn't work, professional data recovery might be needed.
Backup whenever you reset it. Regular updates aren't needed unless your security setup changes.
Conclusion
In conclusion, understanding BitLocker and its recovery key mechanism is crucial for any Windows user, especially when using Surface devices. Throughout this guide, we've explored the essentials of Bitlocker, detailing its vital role in securing Windows devices and the various scenarios that might prompt a recovery key request. Additionally, we provided a comprehensive guide on locating your BitLocker Recovery Key, covering various methods including through a Microsoft account, Active Directory, Azure AD, and other backup strategies.
Effectively managing BitLocker recovery situations is crucial for maintaining the security and integrity of your device. Although facing a BitLocker recovery screen may seem daunting, being equipped with the right knowledge and tools can make a significant difference. Preparedness is invaluable in these scenarios, ensuring you can swiftly regain access to your device without compromising data security.
If you find yourself navigating the complex waters of BitLocker issues on your Surface Device, remember, assistance is just a click away. Reach out to us for expert guidance and support. At Fix Your Surface, we are committed to providing expert support and guidance. Our team is ready to help you navigate through any Bitlocker-related challenges, ensuring your device remains secure and accessible.
We also encourage you to further explore the linked articles for comperhensive BitLocker troubleshooting and preventive strategies, ensuring you're well-equipped to manage any Bitlocker-related issues that may arise. Remember, at Fix Your Surface, we're here to help you every step of the way.
